آموزش Auto Complete در برنامه نویسی اندروید

آموزش Auto Complete در برنامه نویسی اندروید
در این درس از مجموعه آموزش برنامه نویسی سایت سورس باران، در مورد آموزش Auto Complete در برنامه نویسی اندروید صحبت خواهیم کرد.
اگر می خواهید هنگام تایپ پیشنهادهایی دریافت کنید، می توانید این کار را از طریق AutoCompleteTextView انجام دهید. هنگامی که کاربر در حال تایپ است به طور خودکار پیشنهادات را ارائه می دهد. لیست پیشنهادها در یک منوی کشویی نمایش داده می شود که کاربر می تواند از آن طریق موردی را برای جایگزینی محتوای جعبه ویرایش انتخاب کند.
برای استفاده از AutoCompleteTextView ابتدا باید یک زمینه AutoCompletTextView در xml ایجاد کنید. نحو آن در زیر آورده شده است.
|
1 2 3 4 5 6 7 8 |
<AutoCompleteTextView android:id="@+id/autoCompleteTextView1" android:layout_width="wrap_content" android:layout_height="wrap_content" android:layout_alignParentTop="true" android:layout_centerHorizontal="true" android:layout_marginTop="65dp" android:ems="10" > |
پس از آن ، شما باید مرجعی از این textview را در جاوا دریافت کنید. نحو آن در زیر آورده شده است
|
1 2 |
private AutoCompleteTextView actv; actv = (AutoCompleteTextView) findViewById(R.id.autoCompleteTextView1); |
مورد بعدی که باید انجام دهید مشخص کردن لیست موارد پیشنهادی برای نمایش است. می توانید موارد لیست را به صورت آرایه رشته ای در جاوا یا در strings.xml مشخص کنید. نحو آن در زیر آورده شده است.
|
1 2 3 4 |
String[] countries = getResources().getStringArray(R.array.list_of_countries); ArrayAdapter<String> adapter = new ArrayAdapter<String> (this,android.R.layout.simple_list_item_1,countries); actv.setAdapter(adapter); |
کلاس آرایه ی adapter وظیفه نمایش داده ها را به صورت لیست در جعبه پیشنهادات(suggestion box) فیلد متن دارد. از متد setAdapter برای تنظیم آداپتور autoCompleteTextView استفاده می شود. به غیر از این متدها، سایر متدهای Auto Complete در زیر ذکر شده است.
- ()getAdapter
این متد یک آداپتور لیست قابل فیلتر را که برای تکمیل خودکار استفاده شده است را برمی گرداند
- ()getCompletionHint
این متد متن اشاره مورد نظر را باز می گرداند که در پایین لیست تطبیقی نشان داده شده است
- ()getDropDownAnchor
این متد شناسه را برای نمایشی که لیست کشویی auto complete که به آن متصل است را برمی گرداند. ب
- ()getListSelection
این متد در صورت وجود موقعیت انتخاب نمای کشویی را برمی گرداند
- ()isPopupShowing
این متد نشان می دهد که آیا منوی پاپ آپ در حال نمایش است یا نه
- (setText(CharSequence text, boolean filter
این متد، متن را تنظیم می کند با این تفاوت که می تواند فیلتر کردن را غیرفعال کند
- ()showDropDown
این متد لیست کشویی را روی صفحه نمایش می دهد.
مثال
مثال زیر استفاده از کلاس AutoCompleteTextView را نشان می دهد. این یک برنامه اساسی است که به شما امکان می دهد تایپ کنید و پیشنهادات را بر روی دستگاه شما نمایش می دهد.
برای آزمایش این مثال، باید این مورد را روی دستگاه واقعی یا شبیه ساز اجرا کنید.
شرح مراحل
1 شما از Android Studio برای ایجاد یک برنامه Android تحت یک بسته com.example.sairamkrishna.myapplication استفاده خواهید کرد.
2 برای افزودن کد AutoCompleteTextView ، فایل src / MainActivity.java را تغییر دهید
3 طرح XML را تغییر دهید فایل res / layout / activity_main.xml در صورت لزوم هر جز GUI اضافه کنید.
4 برنامه را اجرا کنید و دستگاه اندرویدی در حال اجرا را انتخاب کنید و برنامه را روی آن نصب کنید و نتایج را تأیید کنید.
در اینجا محتوای src / MainActivity.java است
|
1 2 3 4 5 6 7 8 9 10 11 12 13 14 15 16 17 18 19 20 21 22 23 24 25 26 27 28 29 30 31 32 33 34 35 36 37 38 39 40 41 42 43 44 45 46 47 48 49 50 51 |
package com.example.sairamkrishna.myapplication; import android.app.Activity; import android.content.Context; import android.media.AudioManager; import android.media.MediaPlayer; import android.media.MediaRecorder; import android.os.Bundle; import android.os.Environment; import android.view.Menu; import android.view.MenuItem; import android.view.View; import android.view.animation.Animation; import android.view.animation.AnimationUtils; import android.widget.ArrayAdapter; import android.widget.AutoCompleteTextView; import android.widget.Button; import android.widget.EditText; import android.widget.ImageView; import android.widget.MultiAutoCompleteTextView; import android.widget.Toast; import java.io.IOException; public class MainActivity extends Activity { AutoCompleteTextView text; MultiAutoCompleteTextView text1; String[] languages={"Android ","java","IOS","SQL","JDBC","Web services"}; @Override protected void onCreate(Bundle savedInstanceState) { super.onCreate(savedInstanceState); setContentView(R.layout.activity_main); text=(AutoCompleteTextView)findViewById(R.id.autoCompleteTextView1); text1=(MultiAutoCompleteTextView)findViewById(R.id.multiAutoCompleteTextView1); ArrayAdapter adapter = new ArrayAdapter(this,android.R.layout.simple_list_item_1,languages); text.setAdapter(adapter); text.setThreshold(1); text1.setAdapter(adapter); text1.setTokenizer(new MultiAutoCompleteTextView.CommaTokenizer()); } } |
در اینجا محتوای activity_main.xml است
|
1 2 3 4 5 6 7 8 9 10 11 12 13 14 15 16 17 18 19 20 21 22 23 24 25 26 27 28 29 30 31 32 33 34 35 36 37 38 39 40 41 42 43 44 45 46 47 48 49 50 51 52 53 54 55 56 57 58 59 60 61 62 63 64 65 66 67 |
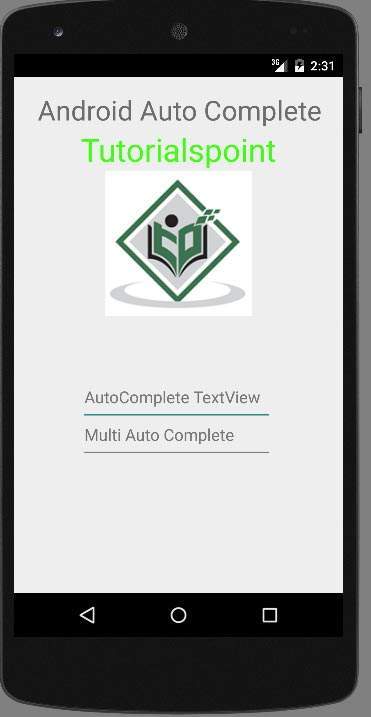
<xml version="1.0" encoding="utf-8"?> <RelativeLayout xmlns:android="http://schemas.android.com/apk/res/android" xmlns:tools="http://schemas.android.com/tools" android:layout_width="match_parent" android:layout_height="match_parent" android:paddingLeft="@dimen/activity_horizontal_margin" android:paddingRight="@dimen/activity_horizontal_margin" android:paddingTop="@dimen/activity_vertical_margin" android:paddingBottom="@dimen/activity_vertical_margin" tools:context=".MainActivity"> <TextView android:layout_width="wrap_content" android:layout_height="wrap_content" android:text="Android Auto Complete" android:id="@+id/textView" android:textSize="30dp" android:layout_alignParentTop="true" android:layout_alignParentRight="true" android:layout_alignParentEnd="true" /> <TextView android:layout_width="wrap_content" android:layout_height="wrap_content" android:text="Tutorialspoint" android:id="@+id/textView2" android:textColor="#ff3eff0f" android:textSize="35dp" android:layout_below="@+id/textView" android:layout_centerHorizontal="true" /> <ImageView android:layout_width="wrap_content" android:layout_height="wrap_content" android:id="@+id/imageView" android:src="@drawable/logo" android:layout_below="@+id/textView2" android:layout_alignLeft="@+id/textView2" android:layout_alignStart="@+id/textView2" android:layout_alignRight="@+id/textView2" android:layout_alignEnd="@+id/textView2" /> <AutoCompleteTextView android:id="@+id/autoCompleteTextView1" android:layout_width="wrap_content" android:layout_height="wrap_content" android:ems="10" android:layout_below="@+id/imageView" android:layout_alignLeft="@+id/imageView" android:layout_alignStart="@+id/imageView" android:layout_marginTop="72dp" android:hint="AutoComplete TextView"> <requestFocus /> </AutoCompleteTextView> <MultiAutoCompleteTextView android:id="@+id/multiAutoCompleteTextView1" android:layout_width="wrap_content" android:layout_height="wrap_content" android:ems="10" android:layout_below="@+id/autoCompleteTextView1" android:layout_alignLeft="@+id/autoCompleteTextView1" android:layout_alignStart="@+id/autoCompleteTextView1" android:hint="Multi Auto Complete " /> </RelativeLayout> |
در اینجا محتوای Strings.xml وجود دارد
|
1 2 3 |
<resources> <string name="app_name">My Application</string> </resources> |
در اینجا محتوای AndroidManifest.xml است
|
1 2 3 4 5 6 7 8 9 10 11 12 13 14 15 16 17 18 19 20 21 22 23 |
<?xml version="1.0" encoding="utf-8"?> <manifest xmlns:android="http://schemas.android.com/apk/res/android" package="com.example.sairamkrishna.myapplication" > <application android:allowBackup="true" android:icon="@drawable/ic_launcher" android:label="@string/app_name" android:theme="@style/AppTheme" > <activity android:name="com.example.sairamkrishna.myapplication.MainActivity" android:label="@string/app_name" > <intent-filter> <action android:name="android.intent.action.MAIN" /> <category android:name="android.intent.category.LAUNCHER" /> </intent-filter> </activity> </application> </manifest> |
بیایید برنامه را اجرا کنیم. من تصور می کنم شما AVD خود را هنگام راه اندازی محیط ایجاد کرده اید. برای اجرای برنامه از Android studio، یکی از پرونده های فعالیت پروژه خود را باز کنید و از نوار ابزار روی  کلیک کنید. Android Studio برنامه را روی AVD شما نصب کرده و شروع به کار می کند و اگر با تنظیمات و برنامه هایتان همه چیز خوب باشد، زیر پنجره شبیه ساز نمایش داده می شود.

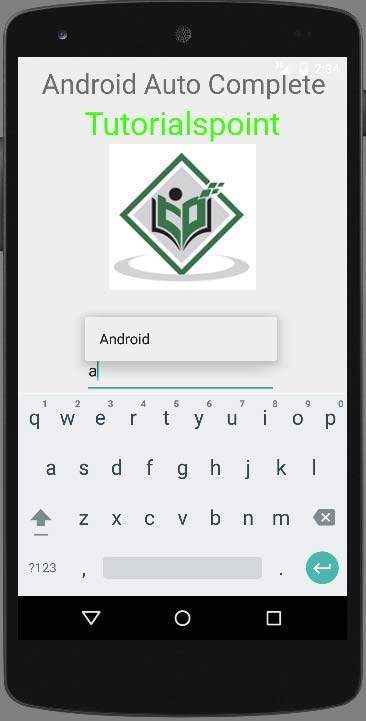
اکنون کافی است که در text view چیزی را تایپ کنید تا پیشنهادها را ببینید. همانطور که من فقط یک حرف a را تایپ می کنم، و به من android را پیشنهاد می دهد.

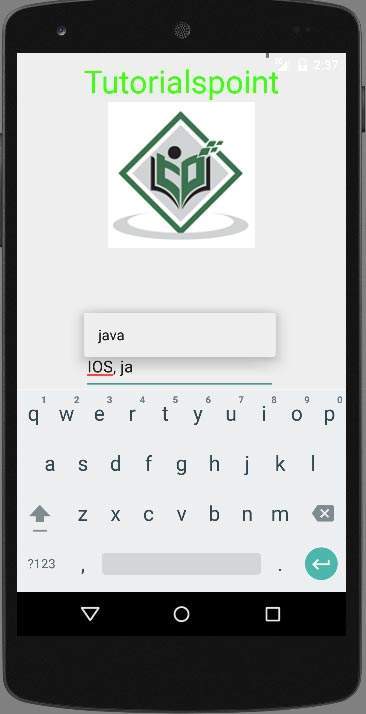
multiAutoCompleteTextView نه تنها یک کلمه بلکه کل متن پیشنهادهایی را نشان می دهد. همانطور که بعد از نوشتن کلمه اول، وقتی شروع به نوشتن کلمه دوم می کنم، پیشنهادات را نشان می دهد. این را می توانید در تصویر زیر نشان دهید.

لیست جلسات قبل آموزش برنامه نویسی اندروید
- نگاهی کلی به برنامه نویسی اندروید
- تنظیمات محیط در برنامه نویسی اندروید
- معماری برنامه نویسی اندروید
- اجزای برنامه در برنامه نویسی اندروید
- Hello World در برنامه نویسی اندروید
- سازماندهی و دسترسی به منابع در برنامه نویسی اندروید
- فعالیت در برنامه نویسی اندروید
- سرویس در برنامه نویسی اندروید
- گیرنده های پخش در برنامه نویسی اندروید
- ارائه دهنده محتوا در برنامه نویسی اندروید
- قطعات در برنامه نویسی اندروید
- Intent و فیلتر در برنامه نویسی اندروید
- طرح بندی رابط کاربری در برنامه نویسی اندروید
- کنترل های رابط کاربری در برنامه نویسی اندروید
- مدیریت رویدادها در برنامه نویسی اندروید
- استایل و تم ها در برنامه نویسی اندروید
- اجزای سفارشی در برنامه نویسی اندروید
- کشیدن و رها کردن در برنامه نویسی اندروید
- نوتیفیکیشن ها در برنامه نویسی اندروید
- سرویس های مبتنی بر مکان در برنامه نویسی اندروید
- ارسال ایمیل در برنامه نویسی اندروید
- ارسال پیامک در برنامه نویسی اندروید
- تماس های تلفنی در برنامه نویسی اندروید
- انتشار برنامه اندروید
- آموزش Alert Dialog در برنامه نویسی اندروید
- انیمیشن در برنامه نویسی اندروید
- ضبط صدا در برنامه نویسی اندروید
- مدیریت صدا در برنامه نویسی اندروید


.svg)
دیدگاه شما