بهترین شیوه ها در برنامه نویسی اندروید

بهترین شیوه ها در برنامه نویسی اندروید
در این درس از مجموعه آموزش برنامه نویسی سایت سورس باران، در مورد بهترین شیوه ها در برنامه نویسی اندروید (Best Practices) صحبت خواهیم کرد.
برخی از روش ها وجود دارد که می توانید هنگام توسعه برنامه اندروید دنبال کنید. این ها توسط خود اندروید پیشنهاد می شوند و با توجه به زمان بهبود می یابند.
بهترین شیوه ها در برنامه نویسی اندروید شامل ویژگیهای طراحی تعامل، عملکرد، امنیت و حریم خصوصی، سازگاری، نکات آزمایش، توزیع و کسب درآمد است.
بهترین شیوه ها در برنامه نویسی اندروید- User input
بعضی از قسمت های متن (textfield) برای کارهای متفاوت در نظر گرفته شده است. به عنوان مثال، برخی از textfield برای متن و برخی دیگر برای اعداد است. اگر مخصوص اعداد است، بهتر است وقتی آن textfield متمرکز است، صفحه کلید عددی نمایش داده شود. نحو آن به صورت زیر است.
|
1 2 3 4 5 6 7 8 9 10 11 |
<EditText android:layout_width="wrap_content" android:layout_height="wrap_content" android:id="@+id/editText" android:layout_alignParentRight="true" android:layout_alignParentEnd="true" android:hint="User Name" android:layout_below="@+id/imageView" android:layout_alignLeft="@+id/imageView" android:layout_alignStart="@+id/imageView" android:numeric="integer" /> |
در غیر اینصورت اگر فیلد شما برای گذرواژه است، باید password hint عبور را نشان دهد تا کاربر بتواند به راحتی گذرواژه را به خاطر بسپارد.
|
1 2 3 4 5 6 7 8 9 10 11 |
<EditText android:layout_width="wrap_content" android:layout_height="wrap_content" android:id="@+id/editText2" android:layout_alignLeft="@+id/editText" android:layout_alignStart="@+id/editText" android:hint="Pass Word" android:layout_below="@+id/editText" android:layout_alignRight="@+id/editText" android:layout_alignEnd="@+id/editText" android:password="true" /> |
بهترین شیوه ها در برنامه نویسی اندروید- Background jobs
فعالیت های خاصی(Background jobs) در برنامه وجود دارد که در پس زمینه برنامه در حال اجرا هستند. این فعالیت ها ممکن است این باشد که از اینترنت چیزی را دانلود کند وموسیقی پخش کند یا کارها دیگری را انجام دهد. توصیه می شود که فعالیت های خاص طولانی مدت نباید در قسمت UI انجام شوند و در سرویس مربوطه یا AsyncTask در پس زمینه انجام می شوند.
AsyncTask Vs Services.
هر دو برای انجام کارهای پس زمینه مورد استفاده قرار می گیرند ، اما service تحت تأثیر اکثر رویدادهای چرخه حیات رابط کاربری نیست، بنابراین در شرایطی که باعث خاموش شدن AsyncTask می شود، به کار خود ادامه می دهد.
بهترین شیوه ها در برنامه نویسی اندروید- Performance
Performance میزان کارایی و یا عملکرد دستگاه شما را هنگامی که به کابل شارژ یا USB نشان می دهد.
هنگامی که دستگاه شارژ می شود، توصیه می شود تنظیمات برنامه خود را به روز کنید، مانند حداکثر میزان تازه سازی هر زمان که دستگاه متصل است. می توان اینگونه انجام داد:
|
1 2 3 4 5 6 7 8 |
IntentFilter ifilter = new IntentFilter(Intent.ACTION_BATTERY_CHANGED); Intent batteryStatus = context.registerReceiver(null, ifilter); // Are we charging / charged? Full or charging. int status = batteryStatus.getIntExtra(BatteryManager.EXTRA_STATUS, -1); // How are we charging? From AC or USB. int chargePlug = batteryStatus.getIntExtra(BatteryManager.EXTRA_PLUGGED, -1); |
بهترین شیوه ها در برنامه نویسی اندروید-Security and privacy
بسیار مهم است که برنامه شما ایمن باشد و نه تنها برنامه، بلکه داده های کاربر و داده های برنامه نیز باید ایمن باشند. عوامل زیر می توانند امنیت را افزایش دهند.
- برای ذخیره سازی فایل های برنامه ها، از حافظه داخلی و نه خارجی استفاده کنید
- هر جا ممکن است از ارائه دهندگان محتوا استفاده کنید
- هنگام اتصال به وب از SSl استفاده کنید
- برای دسترسی به عملکردهای مختلف دستگاه از مجوزهای مناسب استفاده کنید
مثال
مثال زیر برخی از بهترین شیوه هایی را که باید هنگام ایجاد برنامه اندروید دنبال کنید را نشان می دهد. این یک برنامه اساسی است که به شما امکان می دهد نحوه استفاده از قسمت های متنی و چگونگی افزایش کارایی را با بررسی وضعیت شارژ تلفن مشخص کنید.
برای آزمایش این مثال، باید آن را روی یک دستگاه واقعی اجرا کنید.
شرح مراحل
1 از Android studio IDE برای ایجاد یک برنامه Android تحت یک بسته com.example.sairamkrishna.myapplication استفاده خواهید کرد.
2 برای افزودن کد، فایل src / MainActivity.java را تغییر دهید
3 طرح XML را تغییر دهید فایل res / layout / activity_main.xml در صورت لزوم، هر جز GUI اضافه کنید.
4 برنامه را اجرا کنید و دستگاه اندرویدی در حال اجرا را انتخاب کنید و برنامه را روی آن نصب کنید و نتایج را تأیید کنید.
در اینجا محتوای src / MainActivity.java است
|
1 2 3 4 5 6 7 8 9 10 11 12 13 14 15 16 17 18 19 20 21 22 23 24 25 26 27 28 29 30 31 32 33 34 35 36 37 38 39 40 41 42 43 44 45 46 47 48 49 50 51 52 53 54 55 56 |
package com.example.sairamkrishna.myapplication; import android.content.Intent; import android.content.IntentFilter; import android.os.BatteryManager; import android.support.v7.app.ActionBarActivity; import android.os.Bundle; import android.view.View; import android.widget.Button; import android.widget.EditText; import android.widget.Toast; public class MainActivity extends ActionBarActivity { EditText ed1,ed2; Button b1; @Override protected void onCreate(Bundle savedInstanceState) { super.onCreate(savedInstanceState); setContentView(R.layout.activity_main); ed1=(EditText)findViewById(R.id.editText); ed2=(EditText)findViewById(R.id.editText2); b1=(Button)findViewById(R.id.button); b1.setOnClickListener(new View.OnClickListener() { @Override public void onClick(View v) { IntentFilter ifilter = new IntentFilter(Intent.ACTION_BATTERY_CHANGED); Intent batteryStatus = registerReceiver(null, ifilter); int status = batteryStatus.getIntExtra(BatteryManager.EXTRA_STATUS, -1); boolean isCharging = status == BatteryManager.BATTERY_STATUS_CHARGING || status == BatteryManager.BATTERY_STATUS_FULL; int chargePlug = batteryStatus.getIntExtra(BatteryManager.EXTRA_PLUGGED,-1); boolean usbCharge = chargePlug == BatteryManager.BATTERY_PLUGGED_USB; boolean acCharge = chargePlug == BatteryManager.BATTERY_PLUGGED_AC; if(usbCharge){ Toast.makeText(getApplicationContext(),"Mobile is charging on USB", Toast.LENGTH_LONG).show(); } else { Toast.makeText(getApplicationContext(),"Mobile is charging on AC", Toast.LENGTH_LONG).show(); } } }); } @Override protected void onDestroy() { super.onDestroy(); } } |
در اینجا محتوای activity_main.xml است
|
1 2 3 4 5 6 7 8 9 10 11 12 13 14 15 16 17 18 19 20 21 22 23 24 25 26 27 28 29 30 31 32 33 34 35 36 37 38 39 40 41 42 43 44 45 46 47 48 49 50 51 52 53 54 55 56 57 58 59 60 61 62 63 64 65 66 67 68 69 70 71 |
<?xml version="1.0" encoding="utf-8"?> <RelativeLayout xmlns:android="http://schemas.android.com/apk/res/android" xmlns:tools="http://schemas.android.com/tools" android:layout_width="match_parent" android:layout_height="match_parent" android:paddingLeft="@dimen/activity_horizontal_margin" android:paddingRight="@dimen/activity_horizontal_margin" android:paddingTop="@dimen/activity_vertical_margin" android:paddingBottom="@dimen/activity_vertical_margin" tools:context=".MainActivity"> <TextView android:text="Bluetooth Example" android:layout_width="wrap_content" android:layout_height="wrap_content" android:id="@+id/textview" android:textSize="35dp" android:layout_alignParentTop="true" android:layout_centerHorizontal="true" /> <TextView android:layout_width="wrap_content" android:layout_height="wrap_content" android:text="Tutorials point" android:id="@+id/textView" android:layout_below="@+id/textview" android:layout_centerHorizontal="true" android:textColor="#ff7aff24" android:textSize="35dp" /> <ImageView android:layout_width="wrap_content" android:layout_height="wrap_content" android:id="@+id/imageView" android:src="@drawable/abc" android:layout_below="@+id/textView" android:layout_centerHorizontal="true" /> <EditText android:layout_width="wrap_content" android:layout_height="wrap_content" android:id="@+id/editText" android:layout_alignParentRight="true" android:layout_alignParentEnd="true" android:hint="User Name" android:layout_below="@+id/imageView" android:layout_alignLeft="@+id/imageView" android:layout_alignStart="@+id/imageView" android:numeric="integer" /> <EditText android:layout_width="wrap_content" android:layout_height="wrap_content" android:id="@+id/editText2" android:layout_alignLeft="@+id/editText" android:layout_alignStart="@+id/editText" android:hint="Pass Word" android:layout_below="@+id/editText" android:layout_alignRight="@+id/editText" android:layout_alignEnd="@+id/editText" android:password="true" /> <Button android:layout_width="wrap_content" android:layout_height="wrap_content" android:text="Check" android:id="@+id/button" android:layout_below="@+id/editText2" android:layout_centerHorizontal="true" /> </RelativeLayout> |
در اینجا محتوای Strings.xml وجود دارد
|
1 2 3 |
<resources> <string name="app_name">My Application</string> </resources> |
در اینجا محتوای AndroidManifest.xml است
|
1 2 3 4 5 6 7 8 9 10 11 12 13 14 15 16 17 18 19 20 21 22 23 |
<?xml version="1.0" encoding="utf-8"?> <manifest xmlns:android="http://schemas.android.com/apk/res/android" package="com.example.sairamkrishna.myapplication" > <application android:allowBackup="true" android:icon="@drawable/ic_launcher" android:label="@string/app_name" android:theme="@style/AppTheme" > <activity android:name="com.example.sairamkrishna.myapplication.MainActivity" android:label="@string/app_name" > <intent-filter> <action android:name="android.intent.action.MAIN" /> <category android:name="android.intent.category.LAUNCHER" /> </intent-filter> </activity> </application> </manifest> |
بیایید برنامه را اجرا کنیم. من تصور می کنم شما AVD خود را هنگام راه اندازی محیط ایجاد کرده اید. برای اجرای برنامه از Android studio، یکی از پرونده های فعالیت پروژه خود را باز کنید و از نوار ابزار روی  کلیک کنید. Android Studio برنامه را روی AVD شما نصب کرده و شروع به کار می کند و اگر با تنظیمات و برنامه هایتان همه چیز خوب باشد، زیر پنجره شبیه ساز نمایش داده می شود.
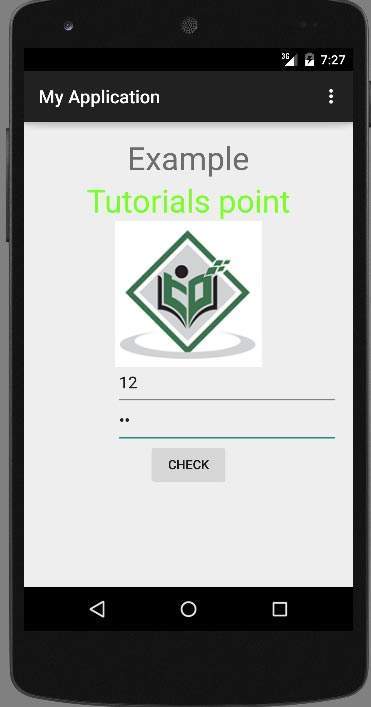
تصویر بالا خروجی برنامه را نشان می دهد
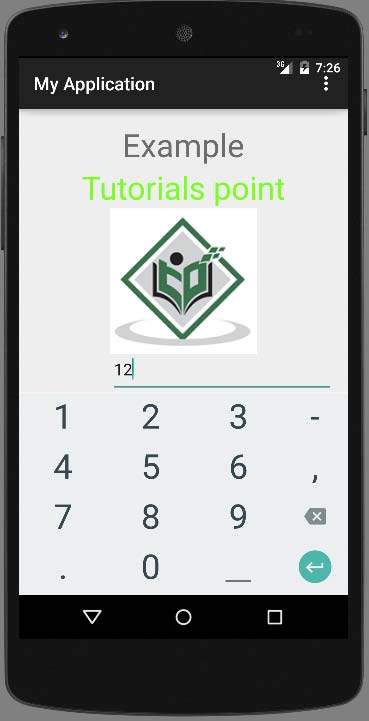
اکنون کافیست در قسمت username تایپ کنید و مشاهده خواهید کرد که پیشنهادات اندرویدی داخلی از دیکشنری شروع به نمایش می کند. این در بالا نشان داده شده است.
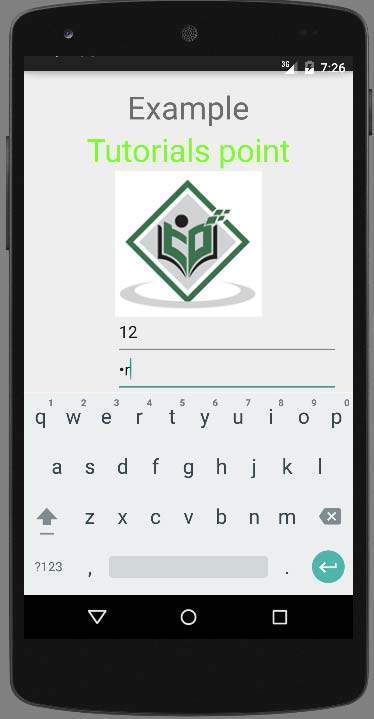
اکنون قسمت password را مشاهده خواهید کرد. به محض شروع به نوشتن در این زمینه ناپدید می شود. در بالا نشان داده شده است.
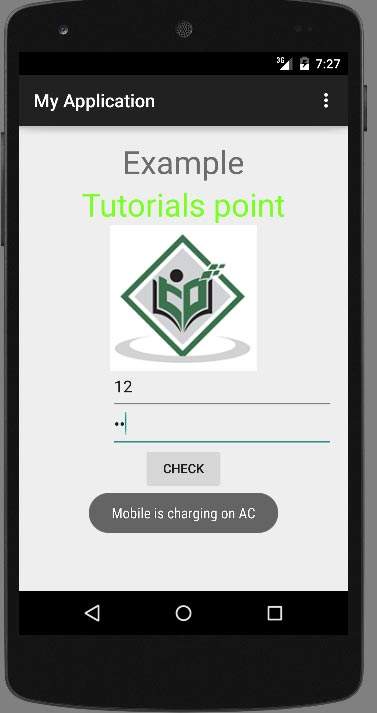
در پایان، فقط دستگاه خود را به کابل AC یا کابل USB متصل کرده و دکمه بررسی شارژ را فشار دهید. وقتی برق AC را وصل می کنیم، این پیام زیر را نشان می دهد.
لیست جلسات قبل آموزش برنامه نویسی اندروید
- نگاهی کلی به برنامه نویسی اندروید
- تنظیمات محیط در برنامه نویسی اندروید
- معماری برنامه نویسی اندروید
- اجزای برنامه در برنامه نویسی اندروید
- Hello World در برنامه نویسی اندروید
- سازماندهی و دسترسی به منابع در برنامه نویسی اندروید
- فعالیت در برنامه نویسی اندروید
- سرویس در برنامه نویسی اندروید
- گیرنده های پخش در برنامه نویسی اندروید
- ارائه دهنده محتوا در برنامه نویسی اندروید
- قطعات در برنامه نویسی اندروید
- Intent و فیلتر در برنامه نویسی اندروید
- طرح بندی رابط کاربری در برنامه نویسی اندروید
- کنترل های رابط کاربری در برنامه نویسی اندروید
- مدیریت رویدادها در برنامه نویسی اندروید
- استایل و تم ها در برنامه نویسی اندروید
- اجزای سفارشی در برنامه نویسی اندروید
- کشیدن و رها کردن در برنامه نویسی اندروید
- نوتیفیکیشن ها در برنامه نویسی اندروید
- سرویس های مبتنی بر مکان در برنامه نویسی اندروید
- ارسال ایمیل در برنامه نویسی اندروید
- ارسال پیامک در برنامه نویسی اندروید
- تماس های تلفنی در برنامه نویسی اندروید
- انتشار برنامه اندروید
- آموزش Alert Dialog در برنامه نویسی اندروید
- انیمیشن در برنامه نویسی اندروید
- ضبط صدا در برنامه نویسی اندروید
- مدیریت صدا در برنامه نویسی اندروید
- آموزش Auto Complete در برنامه نویسی اندروید


.svg)
دیدگاه شما