بلوتوث در برنامه نویسی اندروید

بلوتوث در برنامه نویسی اندروید
در این درس از مجموعه آموزش برنامه نویسی سایت سورس باران، در مورد بلوتوث در برنامه نویسی اندروید صحبت خواهیم کرد.
از بین راه های مختلف، بلوتوث راهی برای ارسال یا دریافت داده بین دو دستگاه مختلف است. پلت فرم اندروید شامل پشتیبانی از فریم ورک بلوتوث است که به دستگاه اجازه می دهد داده ها را به صورت بی سیم با سایر دستگاه های دارای بلوتوث تبادل کند.
اندروید برای انجام این عملیات مختلف، API بلوتوث را فراهم می کند.
- سایر دستگاههای بلوتوث را اسکن کنید
- دریافت لیستی از دستگاه های جفت شده
- از طریق service discovery به سایر دستگاه ها متصل شوید
اندروید کلاس BluetoothAdapter را برای برقراری ارتباط با بلوتوث فراهم می کند. با فراخوانی متد ()static getDefaultAdapter یک شی از این فراخوانی ایجاد کنید. نحو آن در زیر آورده شده است.
|
1 2 |
private BluetoothAdapter BA; BA = BluetoothAdapter.getDefaultAdapter(); |
برای فعال کردن بلوتوث دستگاه خود ، intent را با ثابت بلوتوث ACTION_REQUEST_ENABLE فراخوانی کنید. نحو آن به صورت زیر است.
|
1 2 |
Intent turnOn = new Intent(BluetoothAdapter.ACTION_REQUEST_ENABLE); startActivityForResult(turnOn, 0); |
به غیر از این ثابت، ثابت های دیگری نیز وجود دارد که با استفاده از API، وظایف مختلف را پشتیبانی می کند. آنها در زیر لیست شده اند.
- ACTION_REQUEST_DISCOVERABLE
این ثابت برای روشن کردن بلوتوث استفاده می شود
- ACTION_STATE_CHANGED
این ثابت به شما اطلاع می دهد که حالت بلوتوث تغییر کرده است
- ACTION_FOUND
این ثابت برای دریافت اطلاعات مربوط به هر دستگاهی که کشف می شود استفاده می شود
هنگامی که بلوتوث را فعال (روشن) کردید، می توانید با فراخوانی متد ()getBondedDevices لیستی از دستگاه های جفت شده را دریافت کنید. مجموعه ای از دستگاه های بلوتوث را برمی گرداند. نحو آن به صورت زیر است.
|
1 2 |
private Set<BluetoothDevice>pairedDevices; pairedDevices = BA.getBondedDevices(); |
به غیر از دستگاه های جفت شده، متد های دیگری نیز در API وجود دارد که کنترل بیشتری بر بلوتوث دارد. آنها در زیر لیست شده اند.
- ()enable
این متد در صورت فعال نبودن آداپتور را فعال می کند
- ()isEnabled
اگر آداپتور فعال باشد، این متد مقدار درست را برمی گرداند
- ()disable
این متد آداپتور را غیرفعال می کند
- ()getName
این متد نام آداپتور بلوتوث را برمی گرداند
- (setName(String name
این متد نام بلوتوث را تغییر می دهد
- ()getState
این روش وضعیت فعلی آداپتور بلوتوث را برمی گرداند.
- ()startDiscovery
این متد روند کشف بلوتوث را به مدت 120 ثانیه آغاز می کند.
مثال
این مثال نمایانگر کلاس BluetoothAdapter برای به کار گرفتن بلوتوث و نمایش لیست دستگاه های جفت شده توسط بلوتوث است.
برای آزمایش این مثال، باید آن را روی دستگاه واقعی اجرا کنید.
شرح مراحل
1 شما از Android studio برای ایجاد یک برنامه Android با یک بسته com.example.sairamkrishna.myapplication استفاده خواهید کرد.
2 برای افزودن کد، پرونده src / MainActivity.java را تغییر دهید
3 طرح XML را تغییر دهید فایل res / layout / activity_main.xml در صورت لزوم، هر جز GUI اضافه کنید.
4 AndroidManifest.xml را تغییر دهید تا مجوزهای لازم را اضافه کنید.
5 برنامه را اجرا کرده و دستگاه اندرویدی در حال اجرا را انتخاب کنید و برنامه را روی آن نصب کنید و نتایج را تأیید کنید.
در اینجا محتوای src / MainActivity.java است
|
1 2 3 4 5 6 7 8 9 10 11 12 13 14 15 16 17 18 19 20 21 22 23 24 25 26 27 28 29 30 31 32 33 34 35 36 37 38 39 40 41 42 43 44 45 46 47 48 49 50 51 52 53 54 55 56 57 58 59 60 61 62 63 64 65 66 67 68 69 70 71 72 73 |
package com.example.sairamkrishna.myapplication; import android.app.Activity; import android.bluetooth.BluetoothAdapter; import android.bluetooth.BluetoothDevice; import android.content.Intent; import android.os.Bundle; import android.view.View; import android.widget.ArrayAdapter; import android.widget.Button; import android.widget.ListView; import android.widget.Toast; import java.util.ArrayList; import java.util.Set; public class MainActivity extends Activity { Button b1,b2,b3,b4; private BluetoothAdapter BA; private Set<BluetoothDevice>pairedDevices; ListView lv; @Override protected void onCreate(Bundle savedInstanceState) { super.onCreate(savedInstanceState); setContentView(R.layout.activity_main); b1 = (Button) findViewById(R.id.button); b2=(Button)findViewById(R.id.button2); b3=(Button)findViewById(R.id.button3); b4=(Button)findViewById(R.id.button4); BA = BluetoothAdapter.getDefaultAdapter(); lv = (ListView)findViewById(R.id.listView); } public void on(View v){ if (!BA.isEnabled()) { Intent turnOn = new Intent(BluetoothAdapter.ACTION_REQUEST_ENABLE); startActivityForResult(turnOn, 0); Toast.makeText(getApplicationContext(), "Turned on",Toast.LENGTH_LONG).show(); } else { Toast.makeText(getApplicationContext(), "Already on", Toast.LENGTH_LONG).show(); } } public void off(View v){ BA.disable(); Toast.makeText(getApplicationContext(), "Turned off" ,Toast.LENGTH_LONG).show(); } public void visible(View v){ Intent getVisible = new Intent(BluetoothAdapter.ACTION_REQUEST_DISCOVERABLE); startActivityForResult(getVisible, 0); } public void list(View v){ pairedDevices = BA.getBondedDevices(); ArrayList list = new ArrayList(); for(BluetoothDevice bt : pairedDevices) list.add(bt.getName()); Toast.makeText(getApplicationContext(), "Showing Paired Devices",Toast.LENGTH_SHORT).show(); final ArrayAdapter adapter = new ArrayAdapter(this,android.R.layout.simple_list_item_1, list); lv.setAdapter(adapter); } } |
در اینجا محتوای activity_main.xml است
|
1 2 3 4 5 6 7 8 9 10 11 12 13 14 15 16 17 18 19 20 21 22 23 24 25 26 27 28 29 30 31 32 33 34 35 36 37 38 39 40 41 42 43 44 45 46 47 48 49 50 51 52 53 54 55 56 57 58 59 60 61 62 63 64 65 66 67 68 69 70 71 72 73 74 75 76 77 78 79 80 81 82 83 84 85 86 87 88 89 90 91 92 93 94 95 96 97 98 99 100 101 |
<?xml version="1.0" encoding="utf-8"?> <RelativeLayout xmlns:android="http://schemas.android.com/apk/res/android" xmlns:tools="http://schemas.android.com/tools" android:layout_width="match_parent" android:layout_height="match_parent" android:paddingLeft="@dimen/activity_horizontal_margin" android:paddingRight="@dimen/activity_horizontal_margin" android:paddingTop="@dimen/activity_vertical_margin" android:paddingBottom="@dimen/activity_vertical_margin" tools:context=".MainActivity" android:transitionGroup="true"> <TextView android:text="Bluetooth Example" android:layout_width="wrap_content" android:layout_height="wrap_content" android:id="@+id/textview" android:textSize="35dp" android:layout_alignParentTop="true" android:layout_centerHorizontal="true" /> <TextView android:layout_width="wrap_content" android:layout_height="wrap_content" android:text="Tutorials point" android:id="@+id/textView" android:layout_below="@+id/textview" android:layout_centerHorizontal="true" android:textColor="#ff7aff24" android:textSize="35dp" /> <ImageView android:layout_width="wrap_content" android:layout_height="wrap_content" android:id="@+id/imageView" android:src="@drawable/abc" android:layout_below="@+id/textView" android:layout_centerHorizontal="true" android:theme="@style/Base.TextAppearance.AppCompat" /> <Button android:layout_width="wrap_content" android:layout_height="wrap_content" android:text="Turn On" android:id="@+id/button" android:layout_below="@+id/imageView" android:layout_toStartOf="@+id/imageView" android:layout_toLeftOf="@+id/imageView" android:clickable="true" android:onClick="on" /> <Button android:layout_width="wrap_content" android:layout_height="wrap_content" android:text="Get visible" android:onClick="visible" android:id="@+id/button2" android:layout_alignBottom="@+id/button" android:layout_centerHorizontal="true" /> <Button android:layout_width="wrap_content" android:layout_height="wrap_content" android:text="List devices" android:onClick="list" android:id="@+id/button3" android:layout_below="@+id/imageView" android:layout_toRightOf="@+id/imageView" android:layout_toEndOf="@+id/imageView" /> <Button android:layout_width="wrap_content" android:layout_height="wrap_content" android:text="turn off" android:onClick="off" android:id="@+id/button4" android:layout_below="@+id/button" android:layout_alignParentLeft="true" android:layout_alignParentStart="true" /> <ListView android:layout_width="wrap_content" android:layout_height="wrap_content" android:id="@+id/listView" android:layout_alignParentBottom="true" android:layout_alignLeft="@+id/button" android:layout_alignStart="@+id/button" android:layout_below="@+id/textView2" /> <TextView android:layout_width="wrap_content" android:layout_height="wrap_content" android:text="Paired devices:" android:id="@+id/textView2" android:textColor="#ff34ff06" android:textSize="25dp" android:layout_below="@+id/button4" android:layout_alignLeft="@+id/listView" android:layout_alignStart="@+id/listView" /> </RelativeLayout> |
در اینجا محتوای Strings.xml وجود دارد
|
1 2 3 |
<resources> <string name="app_name">My Application</string> </resources> |
در اینجا محتوای AndroidManifest.xml است
|
1 2 3 4 5 6 7 8 9 10 11 12 13 14 15 16 17 18 19 20 21 22 23 24 25 |
<?xml version="1.0" encoding="utf-8"?> <manifest xmlns:android="http://schemas.android.com/apk/res/android" package="com.example.sairamkrishna.myapplication" > <uses-permission android:name="android.permission.BLUETOOTH"/> <uses-permission android:name="android.permission.BLUETOOTH_ADMIN"/> <application android:allowBackup="true" android:icon="@mipmap/ic_launcher" android:label="@string/app_name" android:theme="@style/AppTheme" > <activity android:name=".MainActivity" android:label="@string/app_name" > <intent-filter> <action android:name="android.intent.action.MAIN" /> <category android:name="android.intent.category.LAUNCHER" /> </intent-filter> </activity> </application> </manifest> |
بیایید برنامه را اجرا کنیم. من تصور می کنم شما AVD خود را هنگام راه اندازی محیط ایجاد کرده اید. برای اجرای برنامه از Android studio، یکی از پرونده های فعالیت پروژه خود را باز کنید و از نوار ابزار روی  کلیک کنید.اگر بلوتوث شما روشن نباشد، برای فعال کردن بلوتوث از شما اجازه می خواهد.

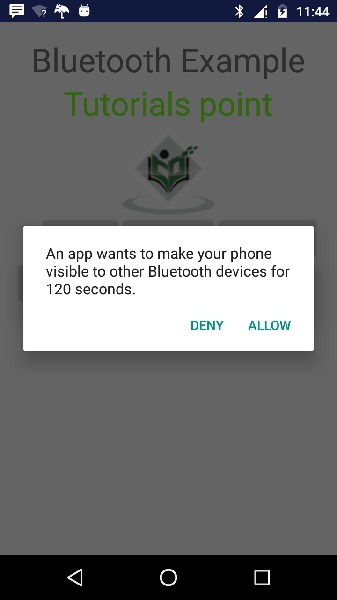
اکنون فقط دکمه Get Visible را انتخاب کنید تا قابلیت مشاهده شما روشن شود. صفحه زیر با درخواست اجازه شما برای روشن کردن و کشف به مدت 120 ثانیه ظاهر می شود.

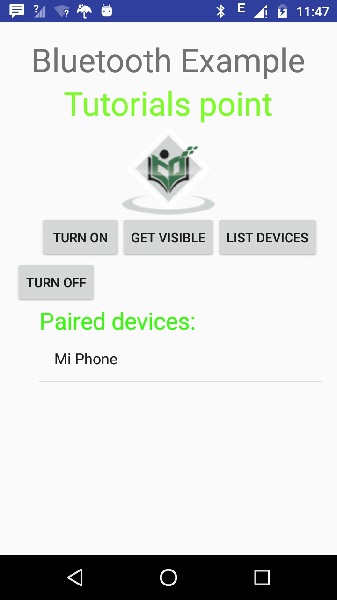
حالا فقط گزینه List Devices را انتخاب کنید. دستگاه های جفت شده را لیست می کند. در زیر نشان داده شده است.

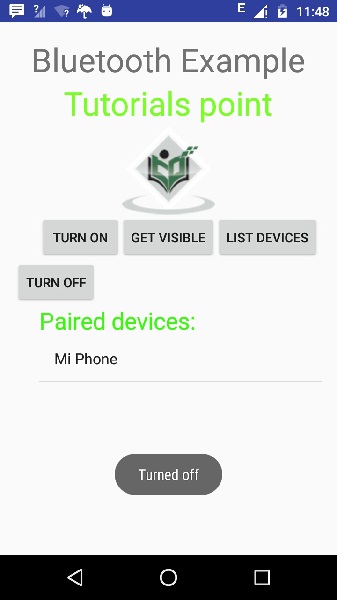
اکنون فقط دکمه Turn off را انتخاب کنید تا بلوتوث خاموش شود. هنگام خاموش کردن بلوتوث پیام زیر نشان داده می شود که نشانگر خاموش شدن موفقیت آمیز بلوتوث است.

لیست جلسات قبل آموزش برنامه نویسی اندروید
- نگاهی کلی به برنامه نویسی اندروید
- تنظیمات محیط در برنامه نویسی اندروید
- معماری برنامه نویسی اندروید
- اجزای برنامه در برنامه نویسی اندروید
- Hello World در برنامه نویسی اندروید
- سازماندهی و دسترسی به منابع در برنامه نویسی اندروید
- فعالیت در برنامه نویسی اندروید
- سرویس در برنامه نویسی اندروید
- گیرنده های پخش در برنامه نویسی اندروید
- ارائه دهنده محتوا در برنامه نویسی اندروید
- قطعات در برنامه نویسی اندروید
- Intent و فیلتر در برنامه نویسی اندروید
- طرح بندی رابط کاربری در برنامه نویسی اندروید
- کنترل های رابط کاربری در برنامه نویسی اندروید
- مدیریت رویدادها در برنامه نویسی اندروید
- استایل و تم ها در برنامه نویسی اندروید
- اجزای سفارشی در برنامه نویسی اندروید
- کشیدن و رها کردن در برنامه نویسی اندروید
- نوتیفیکیشن ها در برنامه نویسی اندروید
- سرویس های مبتنی بر مکان در برنامه نویسی اندروید
- ارسال ایمیل در برنامه نویسی اندروید
- ارسال پیامک در برنامه نویسی اندروید
- تماس های تلفنی در برنامه نویسی اندروید
- انتشار برنامه اندروید
- آموزش Alert Dialog در برنامه نویسی اندروید
- انیمیشن در برنامه نویسی اندروید
- ضبط صدا در برنامه نویسی اندروید
- مدیریت صدا در برنامه نویسی اندروید
- آموزش Auto Complete در برنامه نویسی اندروید
- بهترین شیوه ها در برنامه نویسی اندروید


.svg)
دیدگاه شما