آموزش توسعه برنامه در برنامه نویسی انگولار

آموزش توسعه برنامه در برنامه نویسی انگولار
در این درس از مجموعه آموزش برنامه نویسی سایت سورس باران، به آموزش توسعه برنامه در برنامه نویسی انگولار خواهیم پرداخت.
در این درس، ما در مورد استفاده از AngularJS و Ionic برای توسعه برنامه بحث خواهیم کرد.
Ionic یک چارچوب منبع باز است که برای توسعه برنامه های موبایل استفاده می شود. این ابزار و خدمات را برای ساخت UI موبایل با ظاهر و احساس بومی فراهم می کند. چارچوب یونی برای اینکه بتواند در دستگاه های تلفن همراه اجرا شود ، به لفافه بومی نیاز دارد.
در این درس، ما فقط اصول مربوط به چگونگی استفاده از UI زاویه ای یونی و متحرک را برای توسعه برنامه شما یاد خواهیم گرفت.
برای جزئیات مراجعه به لینک زیر مراجعه کنید
– https://www.tutorialspoint.com/ionic/index.htm.
برای شروع کار با یونی و angularjs ، ابتدا باید cordova را نصب کنیم. دستور به شرح زیر است –
|
1 |
npm install -g cordova |
ایجاد راه اندازی پروژه با استفاده از Cordova
یک پوشه ایجاد کنید ionic_mobileui / و در آن به ما اجازه دهید تنظیمات پروژه خود را با استفاده از دستور زیر ایجاد کنیم –
|
1 |
cordova create ionic-mobileui-angularjs |
در اینجا ionic-mobileui-angularjs نام برنامه ما است.
اکنون اجازه دهید بسته های مورد نیاز پروژه خود را نصب کنیم. لیست زیر ارائه شده است –
|
1 |
npm install --save-dev angular angular-route mobile-angular-ui @ ionic / core |
پرونده ها نصب شده و ساختار پوشه در زیر نشان داده شده است –
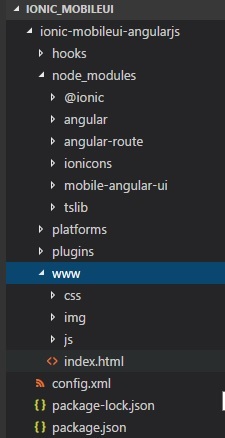
تمام پرونده های زاویه ای و یونی درون node_modules هستند. ما قصد داریم از پوشه www / استفاده کنیم. از این رو فایلهای js و css زاویه ای و یونی را درون پوشه های www / css / و www / js / حرکت دهید.
اجازه دهید index.html را با م componentsلفه های UI گوشه ای تلفن همراه اصلاح کنیم و همچنین app.js را در پوشه js / اضافه کنیم.
index.html
|
1 2 3 4 5 6 7 8 9 10 11 12 13 14 15 16 17 18 19 20 21 22 23 24 25 26 27 28 29 30 31 32 33 34 35 36 37 38 39 40 41 42 43 44 45 46 47 48 49 50 51 52 53 54 55 56 57 58 59 60 61 62 63 64 65 66 67 68 69 70 71 72 73 74 75 76 77 78 79 80 81 82 83 84 85 86 87 88 89 90 91 92 93 94 95 96 97 98 99 100 101 102 103 104 105 106 107 108 109 110 111 112 113 114 115 116 117 118 119 120 |
<!DOCTYPE html> <!-- Licensed to the Apache Software Foundation (ASF) under one or more contributor license agreements. See the NOTICE file distributed with this work for additional information regarding copyright ownership. The ASF licenses this file to you under the Apache License, Version 2.0 (the "License"); you may not use this file except in compliance with the License. You may obtain a copy of the License at http://www.apache.org/licenses/LICENSE-2.0 Unless required by applicable law or agreed to in writing, software distributed under the License is distributed on an "AS IS" BASIS, WITHOUT WARRANTIES OR CONDITIONS OF ANY KIND, either express or implied. See the License for the specific language governing permissions and limitations under the License. --> <html> <head> <!-- Customize this policy to fit your own app's needs. For more guidance, see: https://github.com/apache/cordova-plugin-whitelist/blob/master/README.md#content-security-policy Some notes: * gap: is required only on iOS (when using UIWebView) and is needed for JS->native communication * https://ssl.gstatic.com is required only on Android and is needed for TalkBack to function properly * Disables use of inline scripts in order to mitigate risk of XSS vulnerabilities. To change this: * Enable inline JS: add 'unsafe-inline' to default-src --> <meta http-equiv="Content-Security-Policy" content="default-src 'self' data: gap: https://ssl.gstatic.com 'unsafe-eval'; style-src 'self' 'unsafe-inline'; media-src *; img-src 'self' data: content:;"> <meta name="format-detection" content="telephone=no"> <meta name="msapplication-tap-highlight" content="no"> <meta name="viewport" content="initial-scale=1, width=device-width, viewport-fit=cover"> <link rel="stylesheet" type="text/css" href="css/index.css"> <title>Mobile Angular UI Demo</title> <meta http-equiv="X-UA-Compatible" content="IE=edge,chrome=1" /> <meta name="apple-mobile-web-app-capable" content="yes" /> <meta name="viewport" content="user-scalable=no, initial-scale=1.0, maximum-scale=1.0, minimal-ui" /> <meta name="apple-mobile-web-app-status-bar-style" content="yes" /> <link rel="shortcut icon" href="/assets/img/favicon.png" type="image/x-icon" /> <link rel="stylesheet" href="css/mobile-angular-ui-hover.min.css" /> <link rel="stylesheet" href="css/mobile-angular-ui-base.min.css" /> <link rel="stylesheet" href="css/mobile-angular-ui-desktop.min.css" /> <script src="js/angular.min.js"></script> <script src="js/angular-route.min.js"></script> <script src="js/mobile-angular-ui.min.js"></script> <script src="js/ionic.js"></script> <link rel="stylesheet" href="css/app.css" /> <script src="js/app.js"></script> </head> <body ng-app="myFirstApp" ng-controller="MainController"> <!-- Sidebars --> <div class="sidebar sidebar-left"> <div class="scrollable"> <h1 class="scrollable-header app-name">Tutorials</h1> <div class="scrollable-content"> <div class="list-group" ui-turn-off='uiSidebarLeft'> <a class="list-group-item" href="/">Home Page </a> <a class="list-group-item" href="#/academic"><i class="fa fa-caret-right"></i>Academic Tutorials </a> <a class="list-group-item" href="#/bigdata"><i class="fa fa-caret-right"></i>Big Data & Analytics </a> <a class="list-group-item" href="#/computerProg"><i class="fa fa-caret-right"></i>Computer Programming </a> <a class="list-group-item" href="#/computerscience"><i class="fa fa-caret-right"></i>Computer Science </a> <a class="list-group-item" href="#/databases"><i class="fa fa-caret-right"></i>Databases </a> <a class="list-group-item" href="#/devops"><i class="fa fa-caret-right"></i>DevOps </a> </div> </div> </div> </div> <div class="sidebar sidebar-right"> <div class="scrollable"> <h1 class="scrollable-header app-name">eBooks</h1> <div class="scrollable-content"> <div class="list-group" ui-toggle="uiSidebarRight"> <a class="list-group-item" href="#/php"><i class="fa fa-caret-right"></i>PHP </a> <a class="list-group-item" href="#/Javascript"><i class="fa fa-caret-right"></i>Javascript </a> </div> </div> </div> </div> <div class="app"> <div class="navbar navbar-app navbar-absolute-top"> <div class="navbar-brand navbar-brand-center" ui-yield-to="title"> TutorialsPoint </div> <div class="btn-group pull-left"> <div ui-toggle="uiSidebarLeft" class="btn sidebar-left-toggle"> <i class="fa fa-th-large "></i> Tutorials </div> </div> <div class="btn-group pull-right" ui-yield-to="navbarAction"> <div ui-toggle="uiSidebarRight" class="btn sidebar-right-toggle"> <i class="fal fa-search"></i> eBooks </div> </div> </div> <div class="navbar navbar-app navbar-absolute-bottom"> <div class="btn-group justified"> <a ui-turn-on="aboutus_modal" class="btn btn-navbar"><i class="fal fa-globe"></i> About us</a> <a ui-turn-on="contactus_overlay" class="btn btn-navbar"><i class="fal fa-map-marker-alt"></i> Contact us</a> </div> </div> <!-- App body --> <div class='app-body'> <div class='app-content'> <ng-view></ng-view> </div> </div> </div><!-- ~ .app --> <!-- Modals and Overlays --> <div ui-yield-to="modals"></div> <div class="app"> <h1>Apache Cordova</h1> <div id="deviceready" class="blink"> <p class="event listening">Connecting to Device</p> <p class="event received">Device is Ready</p> </div> </div> <script type="text/javascript" src="cordova.js"></script> <script type="text/javascript" src="js/index.js"></script> </body> </html> |
تمام پرونده های js و css در قسمت head اضافه می شوند. همانطور که در زیر نشان داده شده است ، ماژول و کنترل کننده در داخل app.js ایجاد می شود –
|
1 2 3 4 5 6 7 8 9 10 11 12 13 14 15 16 17 18 19 20 21 22 23 24 25 26 27 28 29 30 31 32 33 34 35 36 37 |
/* eslint no-alert: 0 */ 'use strict'; // // Here is how to define your module // has dependent on mobile-angular-ui // var app=angular.module('myFirstApp', [ 'ngRoute', 'mobile-angular-ui' ]); app.config(function($routeProvider, $locationProvider) { $routeProvider .when("/", { templateUrl : "home/home.html" }); $locationProvider.html5Mode({enabled:true, requireBase:false}); }); app.directive('dragItem', ['$drag', function($drag) { return { controller: function($scope, $element) { $drag.bind($element, { transform: $drag.TRANSLATE_BOTH, end: function(drag) { drag.reset(); } }, { sensitiveArea: $element.parent() } ); } }; }]); app.controller('MainController', function($rootScope, $scope, $routeParams) { $scope.msg="Welcome to Tutorialspoint!"; }); |
پرونده home / home.html را در پوشه www / ایجاد کنید. در زیر جزئیات داخل home.html آورده شده است.
|
1 2 3 4 5 |
<div class = "list-group text-center"> <div class = "list-group-item list-group-item-home"> <h1> {{msg}} </h1> </div> </div> |
برای اجرای برنامه با استفاده از cordova ، دستور زیر را اجرا کنید –
|
1 |
cordova platform add browser |
بعد ، دستور زیر را برای آزمایش برنامه در مرورگر اجرا کنید –
|
1 |
cordova run |
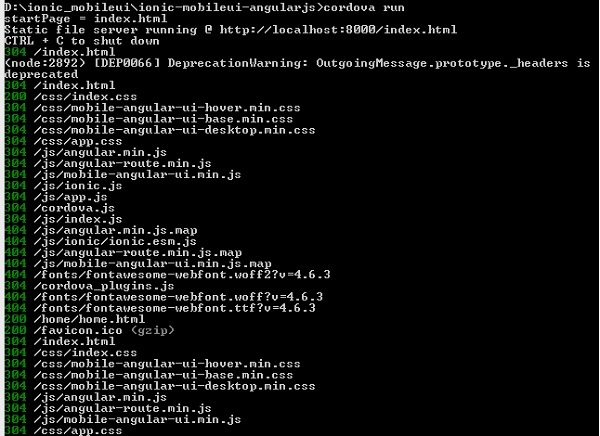
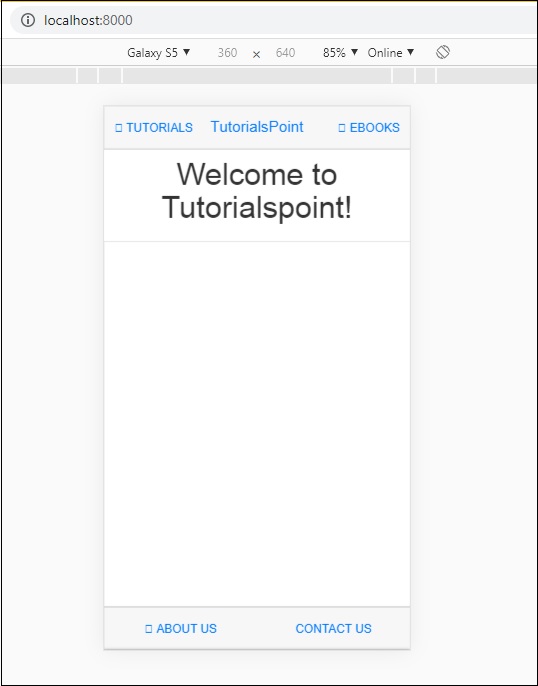
برای آزمایش برنامه ، آدرس url: http: // localhost: 8000 را در مرورگر بزنید.
افزودن کامپوننت آیونیک به برنامه Angular Mobile
home/home.html را باز کنید. ، الگوی کارت آیونیک زیر را اضافه کنید –
home / home.html
|
1 2 3 4 5 6 7 8 9 10 |
<ion-card> <ion-card-header> <ion-card-subtitle>Ionic Card</ion-card-subtitle> <ion-card-title>Mobile Angular UI + Ionic</ion-card-title> </ion-card-header> <ion-card-content> Welcome To TutorialsPoint! </ion-card-content> </ion-card> |
پس از اتمام ، Cordova را متوقف کنید و دوباره اجرا کنید. شما باید جزئیات کارت یونی را همانطور که در زیر نشان داده شده است مشاهده کنید –
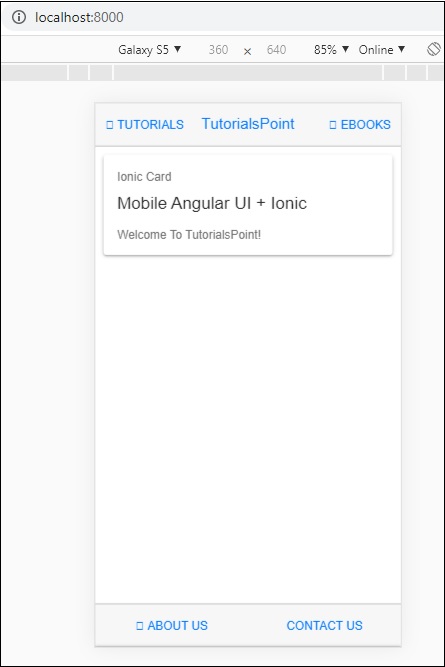
بنابراین اکنون می توانید با استفاده از AngularJs ، Mobile Angular UI و Ionic برنامه ای به انتخاب خود ایجاد کنید.
لیست جلسات قبل آموزش برنامه نویسی انگولار
- آموزش برنامه نویسی انگولار
- بررسی اجمالی برنامه نویسی انگولار
- آموزش نصب انگولار
- آموزش راه اندازی پروژه در برنامه نویسی انگولار
- آموزش اولین برنامه انگولار
- آموزش طرح بندی در برنامه نویسی انگولار
- آموزش مولفه ها در برنامه نویسی انگولار
- آموزش منوی کشویی در برنامه نویسی انگولار
- آموزش منوی آکاردئون در برنامه نویسی انگولار
- آموزش تب ها در برنامه نویسی انگولار
- آموزش کشیدن و رها کردن در برنامه نویسی انگولار
- آموزش مناطق قابل پیمایش در برنامه نویسی انگولار
- آموزش فرم ها در برنامه نویسی انگولار
- آموزش سوایپ کردن در برنامه نویسی انگولار
- آموزش سوییچ تغییر وضعیت در برنامه نویسی انگولار
- آموزش بخش ها در برنامه نویسی انگولار
- آموزش جزئیات اصلی در برنامه نویسی انگولار
- آموزش رویدادها لمسی در برنامه نویسی انگولار
- آموزش PhoneGap و Cordova در برنامه نویسی انگولار
- آموزش ایجاد فایل APK در برنامه نویسی انگولار




.svg)
دیدگاه شما