آموزش اولین برنامه انگولار

آموزش اولین برنامه انگولار
در این درس از مجموعه آموزش برنامه نویسی سایت سورس باران، به آموزش اولین برنامه انگولار خواهیم پرداخت.
در این درس ما اولین برنامه خود را ایجاد خواهیم کرد که روی تلفن همراه و همچنین روی دسک تاپ اجرا می شود.
راه اندازی پروژه ای که در فصل قبل ایجاد کردیم دارای ساختار زیر است –
|
1 2 3 4 5 |
uiformobile/ node_modules/ src/ package.json index.html |
مراحل ساخت یک UI ساده را با استفاده از Mobile Angular UI دنبال کنید.
مرحله 1
همانطور که در زیر نشان داده شده است ، پرونده های css زیر را در بخش html اضافه کنید –
|
1 2 3 4 5 6 7 8 |
<!-- Required for desktop --> <link rel="stylesheet" href="/node_modules/mobile-angular-ui/dist/css/mobile-angular-ui-hover.min.css" /> <!-- Mandatory CSS --> <link rel="stylesheet" href="/node_modules/mobile-angular-ui/dist/css/mobile-angular-ui-base.min.css" /> <!-- Required for desktop --> <link rel="stylesheet" href="/node_modules/mobile-angular-ui/dist/css/mobile-angular-ui-desktop.min.css" /> |
پرونده های js را اضافه کنید –
|
1 2 3 |
<script src="/node_modules/angular/angular.min.js"></script> <script src="/node_modules/angular-route/angular-route.min.js"></script> <script src="/node_modules/mobile-angular-ui/dist/js/mobile-angular-ui.min.js"></script> |
فایل index.html به صورت زیر خواهد بود –
|
1 2 3 4 5 6 7 8 9 10 11 12 13 14 15 16 17 18 19 20 |
<!DOCTYPE html> <html> <head> <meta charset="utf-8"> <title>My App</title> <!-- Required for desktop --> <link rel="stylesheet" href="/node_modules/mobile-angular-ui/dist/css/mobile-angular-ui-hover.min.css" /> <!-- Mandatory CSS --> <link rel="stylesheet" href="/node_modules/mobile-angular-ui/dist/css/mobile-angular-ui-base.min.css" /> <!-- Required for desktop --> <link rel="stylesheet" href="/node_modules/mobile-angular-ui/dist/css/mobile-angular-ui-desktop.min.css" /> <script src="/node_modules/angular/angular.min.js"></script> <script src="/node_modules/angular-route/angular-route.min.js"></script> <script src="/node_modules/mobile-angular-ui/dist/js/mobile-angular-ui.min.js"></script> </head> <body> </body> </html> |
مرحله 2
ما طرح اصلی UI گوشه ای تلفن همراه را به صورت زیر مشاهده خواهیم کرد –
|
1 2 3 4 5 6 7 8 9 10 11 12 13 14 15 16 17 18 19 20 21 22 |
<body ng-app="myFirstApp"> <!-- Sidebars --> <div class="sidebar sidebar-left"><!-- ... --></div> <div class="sidebar sidebar-right"><!-- ... --></div> <div class="app"> <div class="navbar navbar-app navbar-absolute-top"><!-- Top Navbar --></div> <div class="navbar navbar-app navbar-absolute-bottom"><!-- Bottom Navbar --></div> <!-- App body --> <div class='app-body'> <div class='app-content'> <ng-view></ng-view> </div> </div> </div><!-- ~ .app --> <!-- Modals and Overlays --> <div ui-yield-to="modals"></div> </body> |
مرحله 3
یک پوشه js / در src ایجاد کنید و app.js را به آن اضافه کنید.
ماژول را تعریف کرده و UI زاویه دار تلفن همراه و Angular Route را به صورت وابستگی به شکل زیر اضافه کنید –
|
1 2 3 4 5 6 |
<script type="text/javascript"> 'ngRoute', angular.module('myFirstApp', [ 'mobile-angular-ui' ]); </script> |
ng-app = “myFirstApp” را به برچسب <body> اضافه کنید –
|
1 |
<body ng-app="myFirstApp"> |
ماژول mobile-angular-ui دارای لیست زیر است:
|
1 2 3 4 5 6 7 8 9 10 11 12 |
angular.module('mobile-angular-ui', [ 'mobile-angular-ui.core.activeLinks', /* adds .active class to current links */ 'mobile-angular-ui.core.fastclick', /* polyfills overflow: auto */ 'mobile-angular-ui.core.sharedState', /* SharedState service and directives */ 'mobile-angular-ui.core.outerClick', /* outerClick directives */ 'mobile-angular-ui.components.modals', /* modals and overlays */ 'mobile-angular-ui.components.switch', /* switch form input */ 'mobile-angular-ui.components.sidebars', /* sidebars */ 'mobile-angular-ui.components.scrollable', /* uiScrollable directives */ 'mobile-angular-ui.components.capture', /* uiYieldTo and uiContentFor directives */ 'mobile-angular-ui.components.navbars' /* navbars */ ]); |
mobile-angular-ui.min.js ، تمام هسته و اجزای سازنده فوق را در خود دارد. همچنین می توانید به جای بارگیری کل mobile-angular-ui.min.js ، اجزای مورد نیاز را طبق نیاز خود بارگیری کنید.
مرحله 4
همانطور که در زیر نشان داده شده است ، کنترلر را به تگ بدنه خود اضافه کنید –
|
1 |
<body ng-app = "myFirstApp" ng-controller = "MainController"> |
مرحله 5
در طرح اصلی ، <ng-view> </ng-view> را اضافه کرده ایم که بازدیدها را برای ما بارگیری می کند.
اجازه دهید با استفاده از ngRoute مسیرها را در app.js تعریف کنیم. پرونده هایی که برای مسیریابی مورد نیاز هستند در بخش head اضافه شده اند.
یک پوشه home / in src / ایجاد کنید. home.html را با جزئیات زیر به آن اضافه کنید –
|
1 2 3 4 5 |
<div class = "list-group text-center"> <div class = "list-group-item list-group-item-home"> <h1> {{msg}} </h1> </div> </div> |
اکنون هنگام شروع برنامه ، به طور پیش فرض ، می خواهیم home.html در داخل <ng-view> </ng-view> نمایش داده شود.
همانطور که در زیر نشان داده شده است ، مسیریابی در داخل app.config پیکربندی می شود –
|
1 2 3 4 5 6 7 |
app.config(function($routeProvider, $locationProvider) { $routeProvider .when("/", { templateUrl : "src/home/home.html" }); $locationProvider.html5Mode({enabled:true, requireBase:false}); }); |
مرحله 6
همانطور که در زیر نشان داده شده ، {{msg}} را در داخل home.html اضافه کرده ایم –
|
1 2 3 4 5 |
<div class="list-group text-center"> <div class="list-group-item list-group-item-home"> <h1>{{msg}}</h1> </div> </div> |
اجازه دهید همان را که در زیر نشان داده شده در کنترل کننده تعریف کنیم –
|
1 2 3 |
app.controller('MainController', function($rootScope, $scope, $routeParams) { $scope.msg="Welcome to Tutorialspoint!" }); |
مرحله 7
اکنون برای شروع برنامه با استفاده از دستور زیر دستور را اجرا کنید –
|
1 |
node server.js |
|
1 |
<img class="aligncenter" src="https://www.tutorialspoint.com/mobile_angular_ui/images/run_command.jpg" alt="Run Command" /> |
مرحله 8
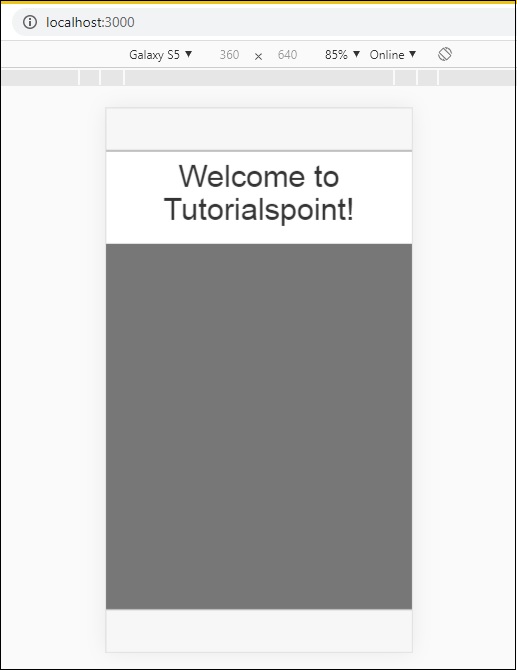
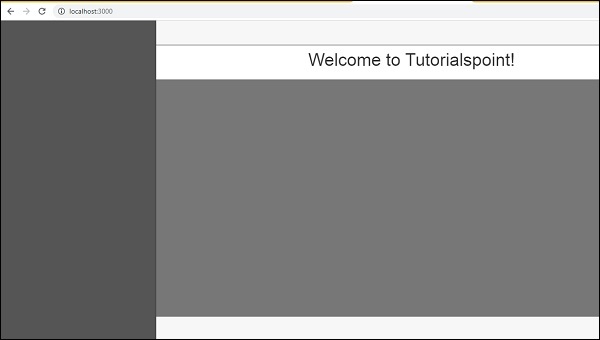
برنامه خود را در مرورگر در http: // localhost: 3000 بارگیری کنید –
صفحه زیر را در حالت موبایل مشاهده خواهید کرد –

صفحه زیر را در حالت دسک تاپ مشاهده خواهید کرد –

اجازه دهید جزئیات هر یک از اجزای سازنده رابط کاربری Angular Mobile را در درس های بعدی درک کنیم.
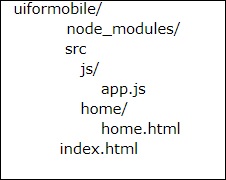
در اینجا کد نهایی نمایشگر فوق وجود دارد. ساختار پوشه تاکنون به شرح زیر است –

index.html
|
1 2 3 4 5 6 7 8 9 10 11 12 13 14 15 16 17 18 19 20 21 22 23 24 25 26 27 28 29 30 31 32 33 34 35 36 37 38 39 40 41 42 43 44 |
<!DOCTYPE html> <html> <head> <meta charset="utf-8" /> <title>Mobile Angular UI Demo</title> <meta http-equiv="X-UA-Compatible" content="IE=edge,chrome=1" /> <meta name="apple-mobile-web-app-capable" content="yes" /> <meta name="viewport" content="user-scalable=no, initial-scale=1.0, maximum-scale=1.0, minimal-ui" /> <meta name="apple-mobile-web-app-status-bar-style" content="yes" /> <link rel="shortcut icon" href="/assets/img/favicon.png" type="image/x-icon" /> <link rel="stylesheet" href="node_modules/mobile-angular-ui/dist/css/mobile-angular-ui-hover.min.css" /> <link rel="stylesheet" href="node_modules/mobile-angular-ui/dist/css/mobile-angular-ui-base.min.css" /> <link rel="stylesheet" href="node_modules/mobile-angular-ui/dist/css/mobile-angular-ui-desktop.min.css" /> <script src="node_modules/angular/angular.min.js"></script> <script src="node_modules/angular-route/angular-route.min.js"></script> <script src="node_modules/mobile-angular-ui/dist/js/mobile-angular-ui.min.js"></script> <script src="src/js/app.js"></script> </head> <body ng-app="myFirstApp" ng-controller="MainController"> <!-- Sidebars --> <div class="sidebar sidebar-left"><!-- ... --></div> <div class="sidebar sidebar-right"><!-- ... --></div> <div class="app"> <div class="navbar navbar-app navbar-absolute-top"><!-- Top Navbar --></div> <div class="navbar navbar-app navbar-absolute-bottom"><!-- Bottom Navbar --></div> <!-- App body --> <div class='app-body'> <div class='app-content'> <ng-view></ng-view> </div> </div> </div><!-- ~ .app --> <!-- Modals and Overlays --> <div ui-yield-to="modals"></div> </body> </html> |
js/app.js
|
1 2 3 4 5 6 7 8 9 10 11 12 13 14 15 16 17 18 19 20 21 |
/* eslint no-alert: 0 */ 'use strict'; // // Here is how to define your module // has dependent on mobile-angular-ui // var app=angular.module('myFirstApp', [ 'ngRoute', 'mobile-angular-ui' ]); app.config(function($routeProvider, $locationProvider) { $routeProvider .when("/", { templateUrl : "src/home/home.html" }); $locationProvider.html5Mode({enabled:true, requireBase:false}); }); app.controller('MainController', function($rootScope, $scope, $routeParams) { $scope.msg="Welcome to Tutorialspoint!" }); |
home/home.html
|
1 2 3 4 5 |
<div class="list-group text-center"> <div class="list-group-item list-group-item-home"> <h1>{{msg}}</h1> </div> </div> |


.svg)
دیدگاه شما